We’re finally getting into the meat and potatoes of basic infantry tactics. The squad wedge and a couple of battle drills will be discussed at length. These concepts are foundational for everything infantry-related. If you’re new to this and haven’t already read Intro to Infantry Doctrine and Intro to Infantry Doctrine, Part 2, I highly encourage you to do so or you may end up lost.
Squads
A squad is composed of two fireteams and a squad leader to coordinate them. Squad movements are performed the exact same way as fireteam movements, except there are two fireteams now. Simply double up everything you learned about fireteam movements and that’s essentially how a squad moves.
The squad column is the most common dismounted patrol formation and for good reason. It has a good balance of speed and security. The squad column is similar to a wedge, except it has two fireteam wedges led by a squad leader in between them. The same concepts apply otherwise.
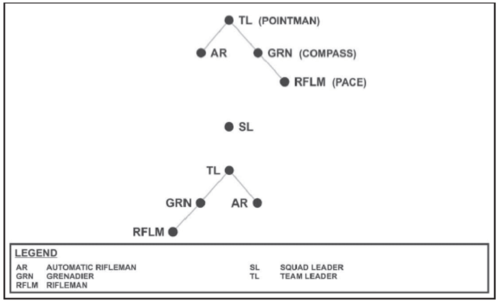
You may ask, “If team leaders lead from the front of their fireteam, why doesn’t the squad leader lead from the front of the squad?” Some would assume that the higher-ranking NCO is simply being afforded more protection because of the significance of his role, but that’s not exactly the whole story. Sure, a SSGT is less replaceable than a PVT, but the real reason the squad leader is in the middle is because of control. The job of the squad leader is to lead both fireteams and make them work in unison. Modern warfare is maneuver warfare, which requires lots of coordination. Every grunt has heard “Shoot. Move. Communicate,” a million times for a reason.
Squad files are the exact same as fireteam files, except the squad leader is in between the fireteams. Again, this is for control purposes. There isn’t much to elaborate on here.
The 3 D’s
Before we proceed, let’s talk about the 3 D’s: Direction, Distance, Description. If you’re taking contact or are about to potentially initiate it, your team needs to know where the enemy is. The 3 D’s are often overlooked and neglected.
Many times, my teammates haven’t called them out or called them out incorrectly in training exercises. There is an example of it in the beginning of this video. Many simply yell “Contact!” because they have tunnel vision and are fixated on the target(s) in front of them.
This is why repetition is so important in the tactical realm. Skills need to be performed subconsciously, not just for muscle memory, but because it frees the mind to focus on more important tasks. In this case, it’s communicating the enemy location to your team… so it’s kind of important. Without knowing where the enemy is or what they’re doing, you can’t react with a plan of attack.
With that said, this is the proper way to conduct the 3 D’s if you take contact. Find cover or concealment. If you saw the enemy, you can communicate while running to cover. Yell out the direction, follow it up with the estimated distance, and finish it with a quick description. “Contact, 2 o’clock! 300 meters! 2 enemies behind that blue truck!” Why yell “contact”? It immediately lets everyone know they’re being shot at it. What if not everyone heard the round(s) due to enemy distance? Maybe they’re using suppressors. It also rules out something stupid like a ND from someone in the squad.
Battle Drills
This is the most important stuff to know. Nomenclature and semantics will be minimized here to explain concepts simply. For the experienced guys, you won’t see me refence specific battle drills here. The reality is, if you can understand gaining fire superiority, suppression, and movement, it doesn’t matter which field manual the information came from or what the battle drill is called. So, calm down keyboard warriors. This is meant to get regular folks up to speed quickly. They can dive deeper into SUT manuals if they decide to go down that path.
Keep in mind, these are hypothetical and simplified scenarios to demonstrate concepts. They don’t include the use of assets (CAS, indirect) that a normal military would have.
React to Ambush (Far) / Squad Attack
In this example, the squad takes contact from 12 o’clock. Immediately everyone in alpha team takes cover and gets on line as best as possible to return fire. (Getting on line helps focus fire and prevents fratricide). Whoever sees the enemy first yells out the 3 D’s, regardless of position, so the team knows where to return fire. The information is then parroted to everyone nearby who needs to hear it and over comms for the squad too.
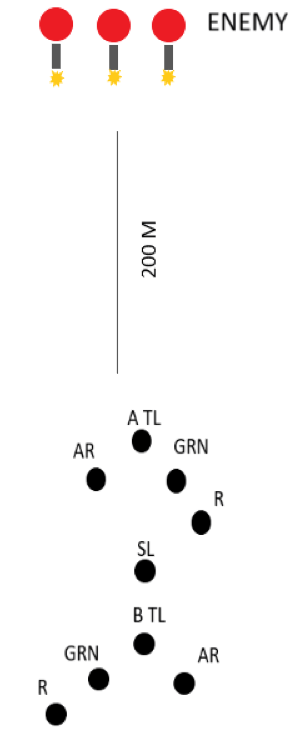
The alpha team leader communicates the situation to the squad leader as quickly as possible. This communication would obviously include the 3 D’s but also other pertinent information like size of the enemy element, fortifications, weaponry used, and anything else that would affect decision-making.
(Note: Bravo team will NOT return fire along with Alpha team at this point. Bravo is behind Alpha and would need to shoot over them. Numerous real-world examples show why this is unsafe. Bravo team will maintain security in the rear until directed by the squad leader).
The squad leader determines if the fire team in contact can gain suppressive fire based on the volume and accuracy of the enemy fire. He decides to flank and assault through the objective. His decision is based on a few factors. First, they estimate only 3 enemies manning a machine gun nest. Being in a squad sized element, they have 9 soldiers which makes this fight a 3:1 ratio. Remember, infantry doctrine says to only pick a fight if the odds are 3:1 or better (preferably much better) so this ratio just barely meets the standard. However, he also knows they won’t be able to break contact without casualties because the enemy has a bead on them. Additionally, he sees a good opportunity in the terrain for a flank.
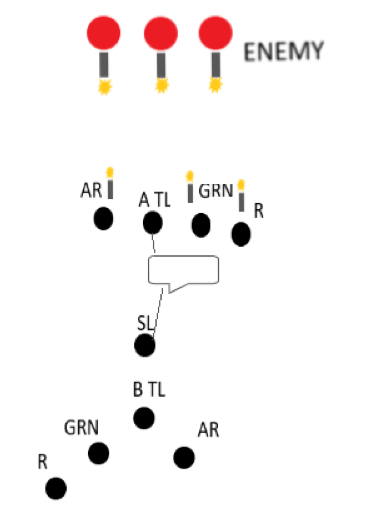
At this point, the squad leader briefs the alpha team leader on alpha’s left and right firing limits to avoid fratricide while bravo moves to flank. He will also mentally map out where alpha needs to shift and lift fire when it comes time for bravo to flank. Lastly, he’ll determine the limit of advance.
The squad leader then briefs bravo team on the plan. Alpha team will continue to suppress and establish a base of fire a while bravo moves to flank. Bravo’s movement can’t be an obvious horizontal move (left or right) because the enemy will see them and know they’re attempting to flank. To prevent this, bravo will move back 200 meters (the rule of thumb is at least one major terrain feature) diagonally and out of the enemy’s line of sight. All the enemy will see is bravo team running away from them and out of sight. To many enemies, this will look like a retreat, but the experienced will know they’re setting up a flank. However, they’ll still have to guess where it will come from since bravo is obscured by terrain at this point.
The squad leader picks up bravo team and the bravo team leader initiates a file formation where they’re going. They know where the enemy is and speed is more important at this point so a file makes sense.
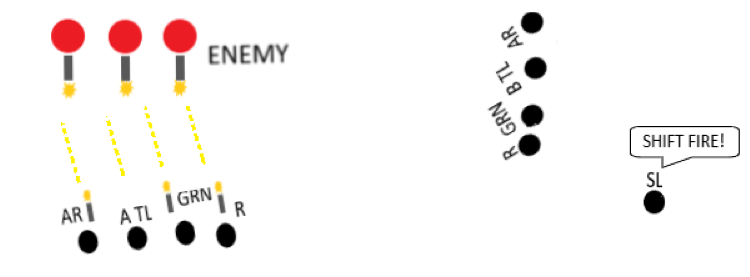
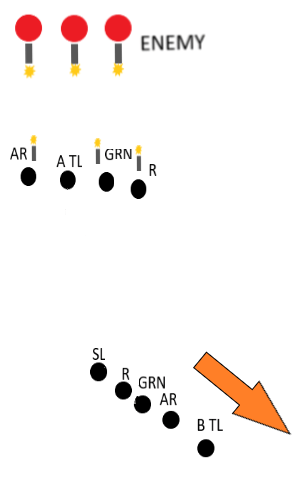
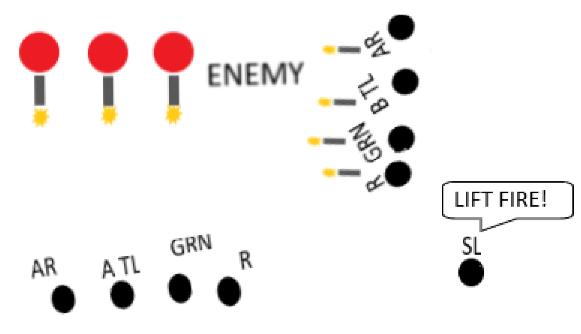
Once they get to the predesignated point, the squad leader tells alpha to shift fire to avoid fratricide. At this point, bravo moves into position and gets on line. The squad leader stays back to maintain control of both teams and tells alpha to lift fire once they hit the next predesignated point.
Bravo then assaults through the objective to kill any remaining enemies. Once the limit of advance is reached, bravo team will yell out “LOA.”

This let’s the squad leader know the objective is cleared to the limit of advance and that alpha team can come regroup. At this point, a 360° security perimeter is established while team leaders check on their guys. Referred to as an ACE report, they’re looking to see how ammunition they have left, if there are any aasualties (some don’t even know when they’re shot until the adrenaline wears off), and if they still have all of their equipment. It’s easy to lose a pair of NODs, radio, maps, etc. if it isn’t tied down and you go through something like this. This report is then given to the squad leader to make sure everyone is okay.
At this point, the EPW (enemy prisoner of war) search team gets to work. Usually, it’s a couple of pre-selected individuals from both fireteams (not the team leaders) who check for survivors. They’re also checking for any valuable intel or equipment, making sure not to trip any parting gifts from dying enemies.
Lastly, the squad needs to consider how long they’re staying on the objective once the enemy has been neutralized. Doctrine says no more than 5 minutes and this is for good reason. The troops they just killed reported receiving contact and someone on the other end of their comms is expecting to hear back from them. If they do not, the Russian and Chinese militaries for example, have no issues calling in indirect fire (mortars and artillery) on their last known positions if they suspect they have been overrun. Remember, it’s important not to impose your beliefs onto the enemy because their cultures may not share the same ideals.
React to Ambush (Near)
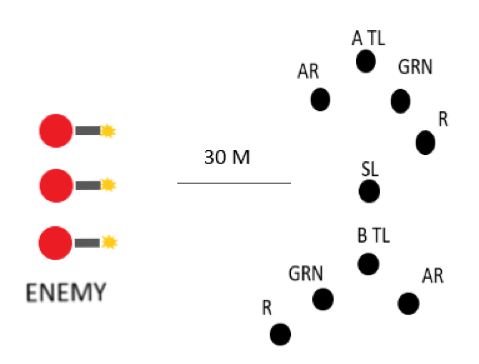
Ambushes are bad enough and usually result in you getting killed. Near ambushes amplify this. What makes an ambush near? If the enemy is within hand grenade range (about 30m), then it’s a near ambush. This makes it awful for a couple reasons.
First, the enemy is so close that any cover the terrain provides is useless. That nice defilade or berm you found to protect against incoming rounds won’t matter if someone throws a grenade into it. Big boulders or trees don’t matter either if a frag lands next to you. Of course, all of this assumes you have usable cover when you get ambushed. Hint: if you don’t, then you should’ve planned your route differently.
Second, the element can’t maneuver when the enemy is less than 50m away. Even the most poorly-trained monkey is going to provide effective fire at that range and this is compounded if they have something with a high rate of fire like a machine gun. This means the element can’t move to break contact and they can’t move to flank the enemy. You’re effectively pinned down by incoming rounds.
At this point you have two options. One, stay frozen with fear and wait to die. Two, accept your fate and do not go gently. Since option one isn’t viable, we’ll explain option two in more detail.

Put simply, the squad gets online and assaults directly through the ambush. Fireteams will take turns bounding toward the incoming fire with as much violence and aggression as possible. The squad needs to be committed to this, as it’s the only chance they have, however small it may be. If nothing else, they should take pride in taking as many enemies with them as possible. If they happen to break through the enemy line, chaos can ensue, as the enemy cannot effectively return fire from the flank since the chance of fratricide will be high. This provides temporary relief for the assaulters while they mow down the rest of the line before engaging the flanking element. Depending on casualties or combat effectiveness of the remaining unit, they can choose to maneuver on the enemy or break contact. Every situation is different.
While the chance of victory is very slim when reacting to a near ambush, this tactic has turned the tide on more than one occasion. SAS BAMF Andy McNab describes this working beautifully in Bravo Two Zero with the movie recreation here. Although it didn’t technically start as a near ambush, the tactics used were very similar. Referencing the Brits once more, they successfully pulled it off again except this time with bayonets.
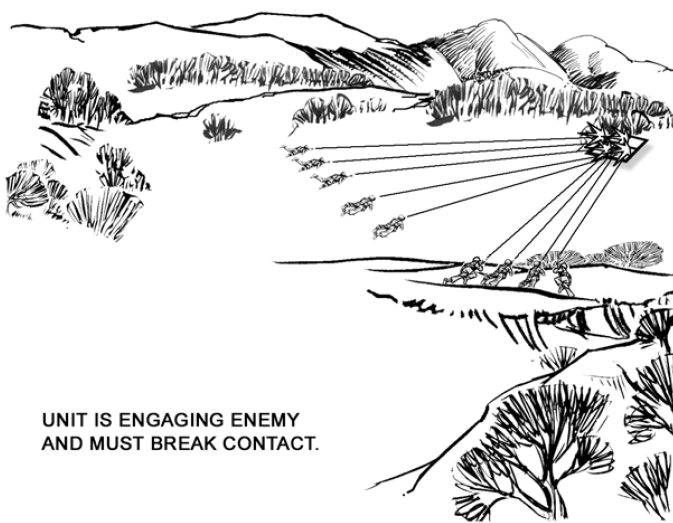
Breaking Contact
This scenario starts off the exact same as React to Ambush (Far). The only difference is the squad leader decides to break contact. This could be due to an overwhelming force, a terrain advantage, or a myriad of other reasons.
A traditional break contact drill needs to be performed. If anyone has smoke grenades, now would be a perfect time to use them. The squad will get online and face the direction of contact to return fire.
The squad leader will initiate which fireteam moves first if one hasn’t already taken the initiative. It’s crucial that one fireteam always covers while the other moves. The best form of cover is suppressive fire in this case.
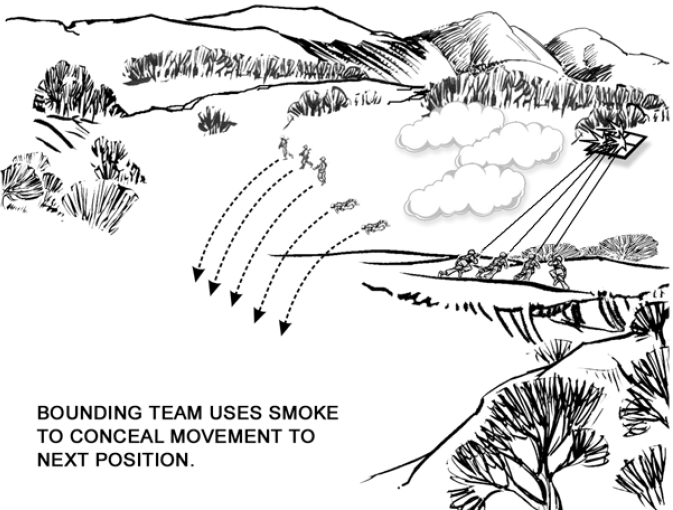
Before moving, in this example the alpha team leader ensures all his team is online and returning fire. He then yells, “Moving!” The bravo team leader yells back, “Move!” after ensuring that his team is providing adequate cover fire. Alpha team proceeds to bound back. (If you’re wondering how far, refer back to my previous post here.)
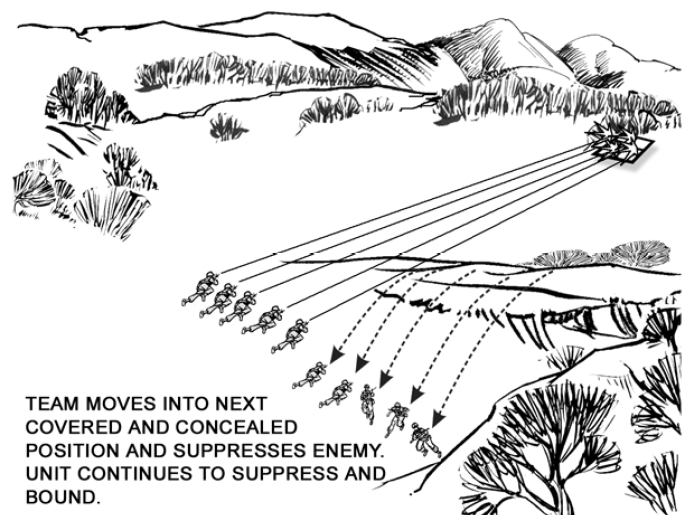
Once alpha team is in place and returning fire, the team leader yells, “Set!” To let bravo team that they can move when ready. This chain keeps repeating until the squad is out of the kill zone. At this point, team leaders would perform an ACE report.
If you happen to be in a narrow area like a canyon or in alleyway that causes the patrol to assume a column formation, there’s an alternate technique for breaking contact. It’s called the Australian or center peel. It shouldn’t be a go-to, as it isn’t as ideal as the traditional way, but it’s the only real solution in confined areas.
Summary
These are the basic building blocks for infantry squad tactics. You may have noticed I opted for poor Microsoft Paint renditions of battle drills over the field manuals in two of the three battle drills. The reasoning was I wanted to ensure the reader fully understands the use of distance and angles in these battle drills. Some of the pictures in the field manual can be a little misleading (you might understand when you see them). If you would like to see the originals and more battle drills, you can find them here. The goal of this post was to explain everything in layman’s terms and act as a primer for future learning. I hope it helped.
The next post will finally be about the basics of CQB. I’ve intentionally kept pushing it off because you need to understand the stuff above (team work, fire superiority, fire and maneuver, etc.) to fully understand CQB. Frankly, if you have the basic knowledge of patrolling and maneuvering, you’ll be substantially more effective than people who rush to their deaths into buildings. Stay tuned for the infamous Battle Drill 6 on the next post.
